CloudBoX: step-by-step instructions
- Make sure that the firmware version of your HortiMaX-Go! controller is 1.2.1 or higher.
- Install the CloudBoX.
- Link the CloudBoX to your account.
- Link the controller to the CloudBoX.
- Install the HortiMaX-Go! app
Make sure that the firmware version of your HortiMaX-Go! controller is 1.2.1 or higher.
- Tap the system time icon ‘
 '. The configuration menu opens.
 - Navigate the path:
 .
.
The current firmware version of your HortiMaX-Go! controller is displayed. If you have an older firmware version than the one specified above, you can download the latest version free of charge from our portal.
Install the CloudBoX
- Make sure that a DHCP server (usually a router) is present in the network.
- Make sure that you have access to the internet, and that your firewall allows http and https traffic on ports 80 and 443.
- Connect the LAN cable. Make sure that this cable is part of the same network as your controller .
- Switch the CloudBoX on by connecting the USB cable.
- Tap and hold the system time icon ‘
 '. The system menu slides over the right sidebar.
 - Tap the cloud menu icon ‘
 '. The cloud menu opens.
Your CloudBoX and its CloudBoX ID are displayed.
If no CloudBoX ID is displayed, check carefully whether you have completed all the steps listed above. Once you have made sure of this, please contact your supplier or go to help.hortimax-go.com for more information.

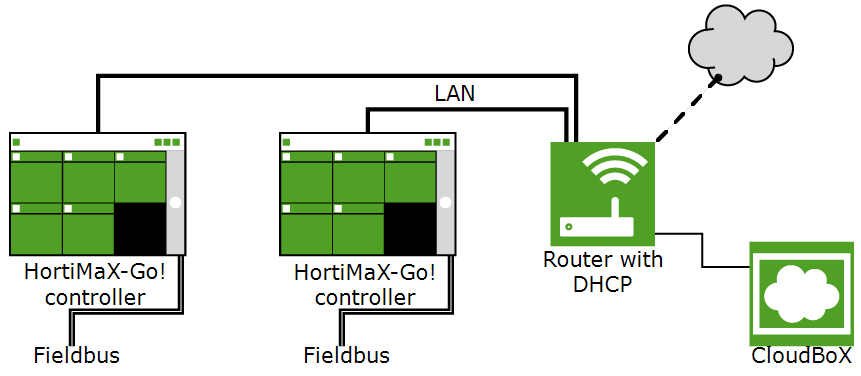
Figure 71: Network connection diagram
Register your CloudBoX
Go to the CloudPortal: https://portal.hortimax-go.com.
| Registering first CloudBoX | Registering extra CloudBoX |
|---|---|
A verification e-mail has been sent to the e-mail address that you entered.
Your CloudBoX is claimed and your registration is complete.
|
You have now added a CloudBoX.
|
Link the controller to the CloudBoX
- Tap and hold the system time icon ‘
 '. The system menu slides over the right sidebar.
 - Tap the cloud menu icon ‘
 '. The cloud menu opens.
The CloudBoXes in the network appear.
- Tap the link CloudBoX to current controller icon ‘
 '.
'. - Wait until this icon is disabled (takes up to 3 minutes).
The controller has been linked to the CloudBoX.
- Tap the CloudBoX status icon ‘
 '.
'. - Check whether the devices are now linked. You should see the controller's serial number listed among the linked controllers (paired).
Install the HortiMaX-Go! app
The HortiMaX-Go! app is available from the App Store and Google Play.
- Launch the app.
- Tap the network settings icon ‘
 '.
'.
| Logging in | Selecting language |
|---|---|
|
|
Use the HortiMaX-Go! app to operate the controller. The app user interface is the same as on the controller.
 '.
'. ’.
’. '.
'.